Hey beautiful people!
Kamali here! I'm excited to come to you and share my first ever me-made coat! This time I am doing more than showing off photos. I will also be sharing my struggles and most favorite parts of this make and the fabrics. Let's dive in shall we?
For this make I decided on the Duchess Coat from Ellie and Mac. I have had this pattern for over a year now. When I bought it, I stalled on making it because it appeared to be time consuming and I was so busy testing at the time. I forgot I had the pattern until Kayla invited us to use this wool and lining. I have to be honest, I was intimidated when I took on this challenge and was reminded of the Duchess coat that I abandoned. I am a firm believer that you have to go for those patterns that scare you in order to grow as a Sewist. This can also be applied to many parts of our lives. We need a challenge to grow!
Instead of buying a new pattern, I thought to brave myself and tackle this one. I have grown as a Sewist so by looking at this pattern now I felt much more comfortable with the instructions and was prepared to tackle this project.
As I mentioned before, this was my first me-made coat so my journey will be a bit more smoother in my next coat. I have never worked with wool or this lining before so I had a few challenges during this sewing process. But first, lets go over the pros!
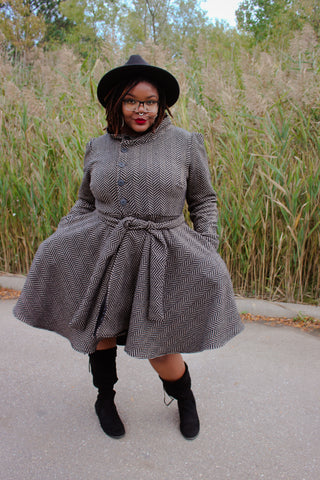
This print with a black lining gives off a classic look. I have chosen this one but the available lining and other wool prints are going to be added to my cart soon!
My favorite part of this coat; the skirt!! The twirl factor is so beautiful! This is a coat that can easily have a mini bodycon underneath with thigh high boots! I love the lower skirt in the back. The overall look is giving me vintage vibes and that is the reason why I chose this coat pattern.
The belt really helps this coat come together well! It's like the icing on the cake because it gives more shape to your body while securing the closure of the coat. The black and beige in this print would look great with a solid black or red belt! I'll keep that in mind for my next coat.
Now I'd like to talk about my troubles.
The good ole buttons. I do not sew buttons often as I find snaps to be quicker (don't judge me) but for a pattern like this obviously buttons are necessary! I did a little practice on some scrap fabric so I didn't mess up that much on this fabric. I figured the buttonholes would have been more challenging but had trouble with one of the five. The buttons were expected to be easy but they were uneven when I stitched them on. I saw an awesome trick from Katy McKinney with tape over the buttons to keep them in place while stitching. Of course, that packaging tape was nowhere to be found when I needed it. Also, I'm warning you all now that office desk Scotch tape doesn't work. I'm just talking from experience. Laugh on and keep on reading.
Another challenge? The slip of the lining led to me seam ripping and stitching over some seams repeatedly. Lets just say I am glad you all cannot see these seams!
Y'all, I MADE A COAT!
My first ever me-made coat! I'm not bothered by the hiccups because I conquered and have a gorgeous coat to show off and keep me warm in the upcoming Michigan winter.
I always keep a beginner's mind and challenge myself often. No matter how fast I progress in my sewing journey, I treat my projects as if I am a newbie. This helps me learn more and develop as a Sewist. This is why I am always taking on new challenges and pattern testing so much!
I would love to make another one for myself in black, or the new Houndstooth prints!
Which coat pattern would you make with these fabrics?